Schedule
Main Window > Schedule
edinn® M2 has a scheduling module. This module allows:
- To indicate, for each process, the results that need to be produced, its target quantity, its specified periods, etc.
- That the working user knows the next order to be produced, what is the target quantity, what period, etc.
- To know, in real time, the produced quantity compared to the scheduled quantity.
- That the working user can automatically do a result change by starting a scheduled order.
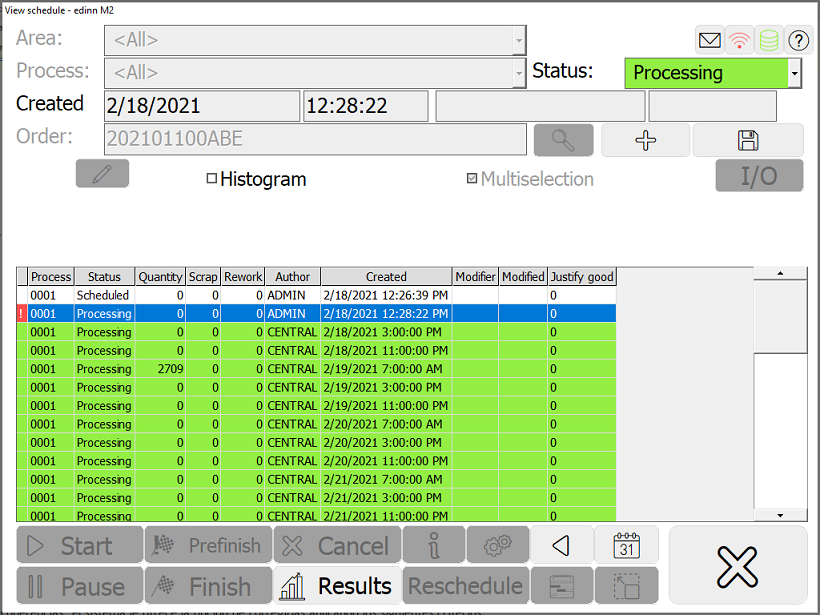
The view schedule window shows the work orders of processes and areas. The view schedule window can be accessed from 2 origins:
- From the
 button on the main window.
 - From the button on the Results Window.
The detail of the window is as follows:

Note that the columns of the table can be hidden or shown per user through the icon which will be shown in the top right corner of the table and in the Resources configuration.
Selectors and text boxes:
- Area: select the area you want to see its work load.
NOTE: Archived areas will not appear in the selector. To learn more about archiving areas see area configuration.
- Process: specify for which process you want to see its work load.
- Status: orders can be in different status. This selector filters the orders to be showed.
- Since (start date and time and end date and time): type the period to search the orders.
- Filter: text that will filter which orders will be shown. This filter will be applied to: Order Id, Results Id, Comments, 'Ref' field and Description of result.
- Current shift: in the table view, it shows the orders planned in future shifts with the text in gray color.
- Histogram: in the gantt view, shows the histogram of consumptions of the selected result.
- Multiselection: allows to select multiple orders and to modify them all simultaneously.
Buttons:
 Search: updates the list of orders.
- Update button: recalculates the quantities produced in one order. There must be one selected.
 Comment: Allows you to add a comment to an order or show a previously added comment.
- I/O button: goes to the Input/Output window which shows the inputs and outputs of the order.
- Start button: starts the order. The process is starting to work for the selected order.
- Prefinish button: the selected order is considered finished, although some checks should be performed to confirm this and pass the order to definitely finished, with the 'Finish' button.
- Cancel button: the selected order is canceled.
- Information (i) button: shows all the information of the selected order.
- Edit button: opens the window to change the schedule.
- Pause button: the selected order is going to be paused.
- Finish button: the selected order is considered definitely finished.
- Assign button: the selected order will be parcially or totally transferred to another process.
 Gantt: view the Gantt chart:
 Maximize button: allows to expand or collapse the data area of the window in order to show more or less orders.
- Results button: it allows access to the production records belonging to the work period of the order. If we had activated the Order detail button, and there would be inconsistencies, then it will show them.
 Order detail: shows the different periods in which the work order has been in progress and the states through which it has passed. For example, when and in what process was initiated, when it was paused, if it was assigned to another process, etc.
NOTE: You can use the CTRL key to select a range of records in the table, like it is normally done with the SHIFT key.
Let us provide further explanation about the Order detail functionality.
There may be inconsistencies between production records and work orders, for example productions that are not assigned to any order or assigned to an order different than the one that was started. The orders with inconsistencies will be indicated with the red background in the box of the quantity produced.

The periods of the work order where inconsistencies have been detected will be indicated by the red background in the first cell of the table and an exclamation mark.
Selecting the period with inconsistencies, the system offers you the option to correct them by applying the following criteria:
- If there are unassigned records to a order, just before the start of one, these records will be assigned to that order and its start time will be advanced.
- If there are records assigned to a order, just before the beginning of said order, its start time will be advanced.
- If there are records without assignment to any order, during the period of execution of one, records will be assigned to said order.
- If there are records assigned to an order in the execution period of a second order, records will be assigned to the second order.


