Step 3. Install & configure OPC Bridge
NOTE: If you choose full service with an eHUB, you do not have to perform the following steps.
- Download the edinn OPC Bridge folder from the edinn Academy, IoT area here

- Unzip the file just downloaded and execute, from the edinn_OPC_Bridge_Setup folder, the file setup.exe and follow the steps to install.
- Once installation is finished, a pop-up window will show up to proceed with the OPC Bridge configuration. If this window would not show up, you can execute, with administrator permissions, the program C:\Program Files (x86)\edinn\edinnM2\OPCBridge\edinnM2_OPCBridge_Configurator.exe and follow next steps:
A) Type the internal company Id of the company you created in Step 1 (a 10-digit number written on the e-mail you will receive after creating your company).
B) Type the URL based on the server where you created your company. For example, if you created your company in this server eu-1.ecloud.edinn.com, you should type:
https://eu-1.ecloud.edinn.com/edinnM2/monitor/?
C) Type the password that you typed when you created the company in Step 1, which has also become the monitoring password, which can be different to your user password and can be changed in the monitoring step of the configuration wizard.
It is not necessary to type anything in the "Simulations Folder" field. Accept the configuration.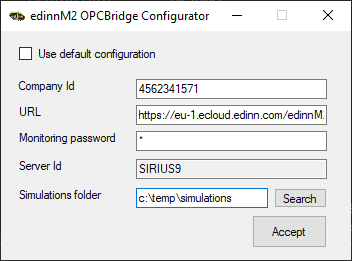
Need help? ![]()