3. Slave Configuration
Once completed the Initial requirements and the configuration of the master, you can proceed with the configuration of the slave server which is explained in this section.
The slave server, as it is an edinn server, must be installed as an edinn local server following all the steps which are explained in the technical guide "edinn Server Installation and Maintenance Guide", which is available for installers in the edinn Academy.
Step 10. Stop services in the Slave server
- Go to path C:\Program Files (x86)\edinn\edinnM2\Server and execute, with administrator permissions, the program edinnM2_Console.exe.
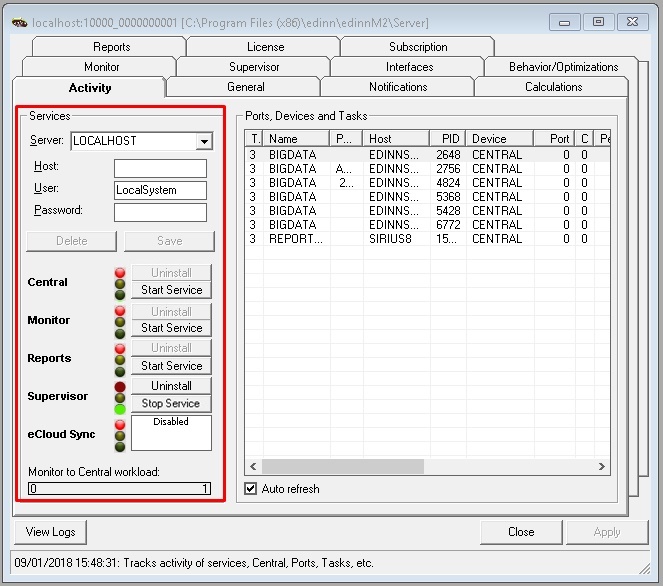
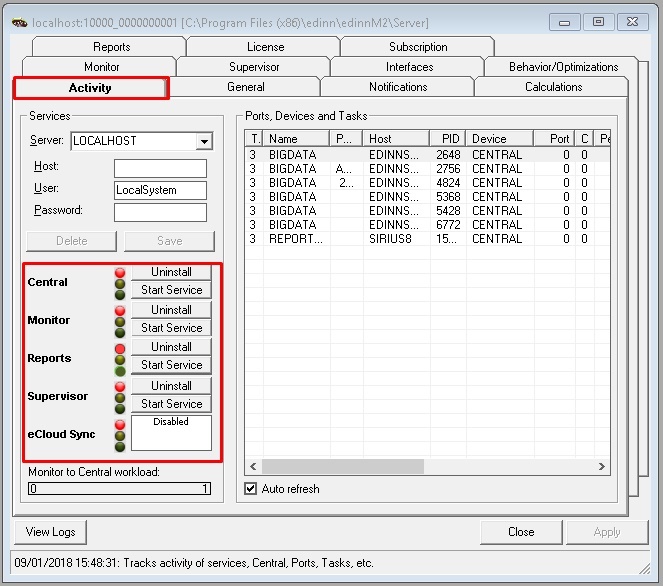
- In the Activity tab press “Stop service” in each of the services, going from bottom to top (starting with the Supervisor)
- In the License tab, copy the license to a notepad or file, to be used later.
WARNING: do not forget to copy the License field content to a notepad of file. If you do not provide this valid license later for this slave server, Recovery procedure will not work as this slave server will not run as a master server when needed.
Step 11. Database restore.
Perform a database restore of the Master Backup that you have done in the previous step:
- From the Windows search icon, type “MySQL Administrator” and right-click the app returned and select “Run as administrator”.
- Enter the Restore tab, click on "Open Backup File", choose a Backup file and then click "Open"
- Click on "Start Restore"

- Once restored, use a database editor (for example the SQLYog application recommended before), and edit the table edinnm2.comp and change, in all fields, the IP address of the master server by the IP address of this slave server.
Step 12. Supervisor Configuration
If you have the edinnM2_Console.exe running, close it. Then run again edinnM2_Console.exe as administrator and:
- Open the Supervisor tab. By default, recovery is inactive. Configure the following parameters:
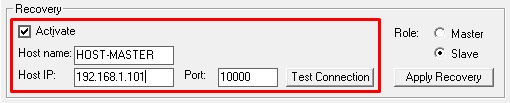
Where:
- Host name: is the remote host name. You can find it in the properties window of the master server computer.
- Host IP: find it by writing the command "ipconfig" in cmd.exe in the master server computer.
Write here the information from the master server:
- Switch on the Activate checkbox: to enable the rest of the fields.
- Host name: is the name of the master server in the network, the one you are trying to connect to.
- Host IP: is the IP of the master server in the network.
- Port: write '10000'.
- Open the General tab and in the Database configuration section, type the Update user (usually: root) and type the password of that user on the field below.
- After performing the restore of the database in the previous step, the edinn license of this server has been replaced by the license of the master server. Please paste in the License tab, in the License field, the license from the notepad or file where you copied it in the previous step, or request for a new license to edinn.
WARNING: if you do not provide a valid license for this slave server, Recovery procedure will not work as this slave server will not run as a master server when needed.
Step 13. Test connection
After parameters are filled in, click on the button "Test Connection" to test the connectivity between the servers. Do this step from both the slave and the master server.
WARNING: Remember to do it for both servers because we need to guarantee that the servers can connect to each other and that they have the appropriate permissions.
If you forget to fill any field or you don’t do it rightly, a message box will appear showing you the reason of the error when testing the connection:
- "Host IP is mandatory and must have a valid IP address."
- "Host port is mandatory and must have a value between 0 and 65535."
- "Host name is mandatory."
When field are good filled, you will be asked if you want to proceed to the test. Press "Yes" to proceed. If any error occurs, it will appear an error message like the one that follows:
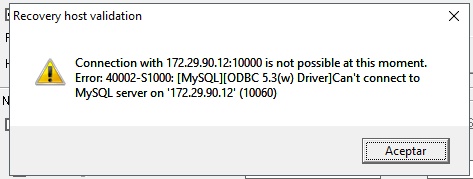
If the connection can be stablished, a success message will appear: "Connection with HostI:Port successful!"
Step 14. Apply Recovery
- In the Console, Supervisor tab, Recovery section, select the Slave role.
- Press the "Apply" button of the Recovery section.
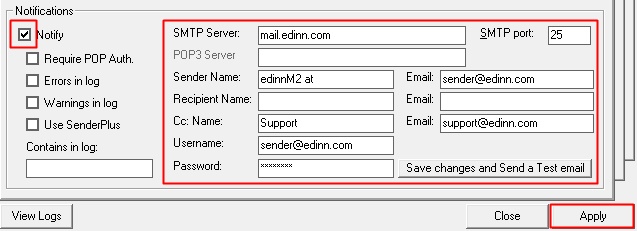
Step 15. Failure Reporting Configuration
To enables server to inform by e-mail about the failures and other issues, you must enable Notify in Notifications frame and fill the fields as you can see in the image bellow.
Remember to click on “Apply” button to save changes.
NOTE: for more information of the Notifications configuration, please see: Notification.
Step 16. Start Supervisor service in the Slave server
- Go to path C:\Program Files (x86)\edinn\edinnM2\Server and execute, with administrator permissions, the program edinnM2_Console.exe.
- In the Activity tab press “Start service” ONLY for the Supervisor service.