How to configure a resource step by step
The resources of a process are usually the users and operators. In [Click to configure] select [Resources].
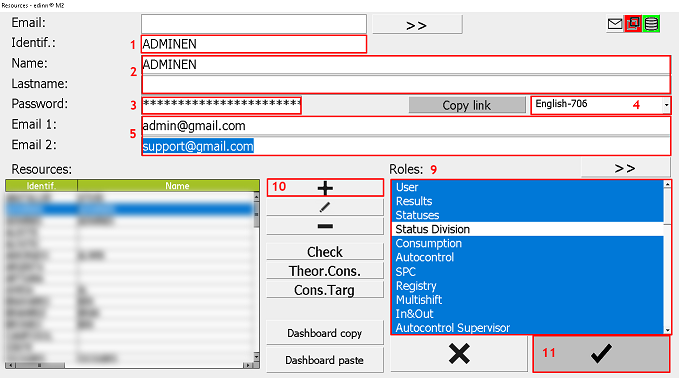
Step 1. Configuration for each resource
Follow the steps below to create a new edinn user:
- Identif.: define an identifier (nickname) for the user.
- Name & lastname: write the name and last name of the user.
- Password: define an initial password for the user, it can be modified later by the user.
- Language: select the language of the terminal for the user.
- Email 1 & 2: write 1 or 2 emails to notify the user of different events or incidents.
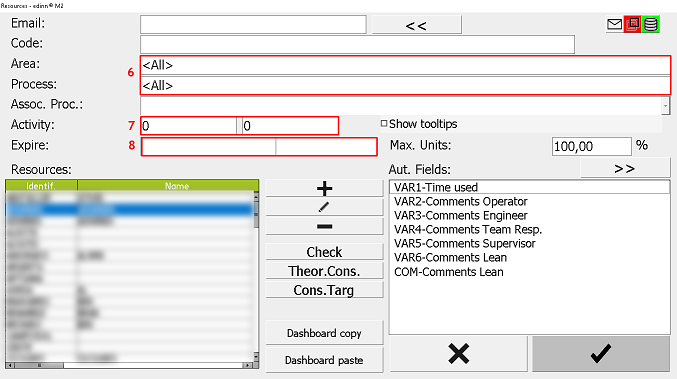
- Area & processes: press
 and in [Areas] and [Processes], like devices, people also have permissions to see certain processes and areas. To limit this visibility, write in both fields the areas and processes that you want to be displayed, separated by commas (e.g: Area: L1, L2, L3, Process: B902, A101.)
 - Activity: define a percentage or goal of activity for the user, eg: if you want to incorporate incentives based on the activity of the employee, you can set a goal of 100% when a resource (person) gets a process with an OEE ratio greater than 80% , in this way, a resource (person) can reach an activity ratio of more than 100%, and therefore, receive incentives.
- Expire (optional): set an expiration date for the user's permissions. Usefulness: if the company has temporary workers, the permissions can be limited to a specific season, to avoid that other employee mistakenly uses the identifier of an operator that is no longer working or, to avoid configuring again a resource, if it is reincorporated the the following season. In this case, only the expiration date would have to be deleted.
- Resources: select from the table the functions or roles that the configured user will have (eg: give the user permission to justify stops, view reports, start self-control tasks...). To see the available roles, please go to Resources configuration.
NOTE: this is the common configuration, the rest of the fields are usually defined by default, for more information, please go to: Resources configuration.
Step 2. Save changes
- Press
 to insert the user's configuration in the table. Repeat this action for each resource or user.
 - Press
 to make all the changes effective.