Step 3. Connect and start
NOTE: If you choose full service with an eHUB, you do not have to perform the following steps.
- Go back to the configuration wizard, step of Monitoring Configuration.
- Choose method edinnBOX_1 for all the signals that you have connected and save changes. Please notice that only certain signals types are available from this wizard. To use all the signals types you need to access the console of the server, Monitor tab, or request help to edinn.
- Click on OPCServer/URL to see the computers where edinn OPC Bridges are running and connected to this company. If OPCServer/URL is not showing the name of the computer where you installed the edinn OPC Bridge, be sure of having saved the changes in the previous step, click the Refresh button and try again. If the problem persists, please contact edinn.
- At IP:Port column it is necessary to write the PLC IP address and Port in the following way: XXX.XXX.XXX.XXX:YYY where X are the 4 IP address digits and Y the Port digits. You can see an example in the image below.
- Click on DCOM/EndPoint and select the FATEK.FatekNetOPC.1 from the list of OPC Servers found by the edinn OPC Bridge.
- Type the name of the item (also known as Tag) that you want to read. Please note that:
- Results, Scrap and Rework items need counters, which Items (Tags) are like this CNN, where NN goes from 00 to 31.
- The rest of the items (Available, Saturation, Justify, etc.) need signals, which items (Tags) are like this:
- XNN: where NN goes from 00 to 31. These are to read direct inputs of the eBOX.
- For example, if you connect the input number N from the eBOX to a certain signal, then that is:
- C0N: if you want to use the counter which counts the pulses on that signal.
- X0N: if you want to read the direct status of the input signal.
- Click on the Save and Refresh buttons. Repeat after a few seconds until the Value shows the actual value of the item in the eBOX and the Last Update shows the actual date time. Once this happens, your system is fully configured:

Configuring the eBOX transmission LED
Monitoring eBOXes come with 2 LEDs: one indicating power on, and the other indicating that data is entering correcly into an edinn server.
Verify that the two LEDs on the eBOX case (power on and transmission) turn on.
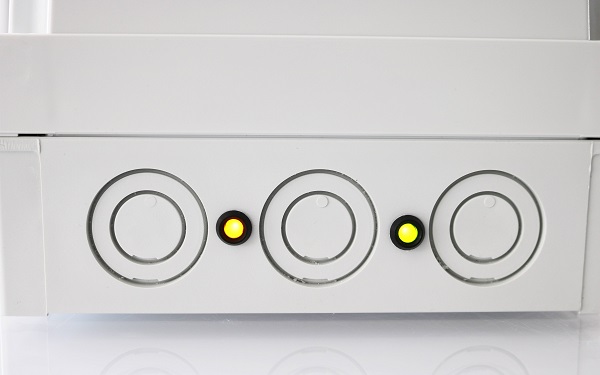
The communication LED (transmission) will turn on automatically when using the edinnBOX_1 monitoring method, or if the LifeBit signal is configured manually. This LED not only turns on by connecting the eBOX (PLC) to the data network, it also verifies that the monitored data is actually entering the server of the edinn platform and is being stored correctly.
If they do not turn on, please check:
- After connecting the RJ45 cable, it can take up to 1 minute for the light on the right to turn ON.
- eBOX is correctly powered on.
- There is internet connection on the RJ45 cable.
- In certain models, the TCP/IP port must be opened in your router and redirected to the eBOX internal IP address.
If still does not connect, please contact edinn.
Need help? ![]()